In Part 1: Understanding Cycle Menus – The Secret to Smarter School Nutrition Planning, we learned what a cycle menu is and why it matters. Now it’s time for the fun part: building cycle menus!
When done right, a cycle menu becomes a powerful tool that supports your staff and keeps students excited about what’s on the menu. You know why cycle menus matter, so let’s dive into how to build one that works for your program.
Step 1: Set Goals and Parameters
Start with a strong foundation. Think about the size of your district, the number of students you serve, how many staff you have, your available equipment, storage space, delivery schedules, and your budget. These details will help you figure out what kind of menu will actually work for your program.
Decide how long your cycle menu should be. Smaller districts with fewer students and staff may choose a shorter cycle. Larger districts serving thousands of students, with more resources, may choose a longer cycle menu.
Set measurable goals for what you want to achieve:
- Are you hoping to boost participation?
- Do you want to reduce waste or control costs?
- Are you looking for ways to make operations easier for your team?
Defining clear goals gives your cycle menu direction and helps you measure success over time.
Step 2: Collect Data and Feedback
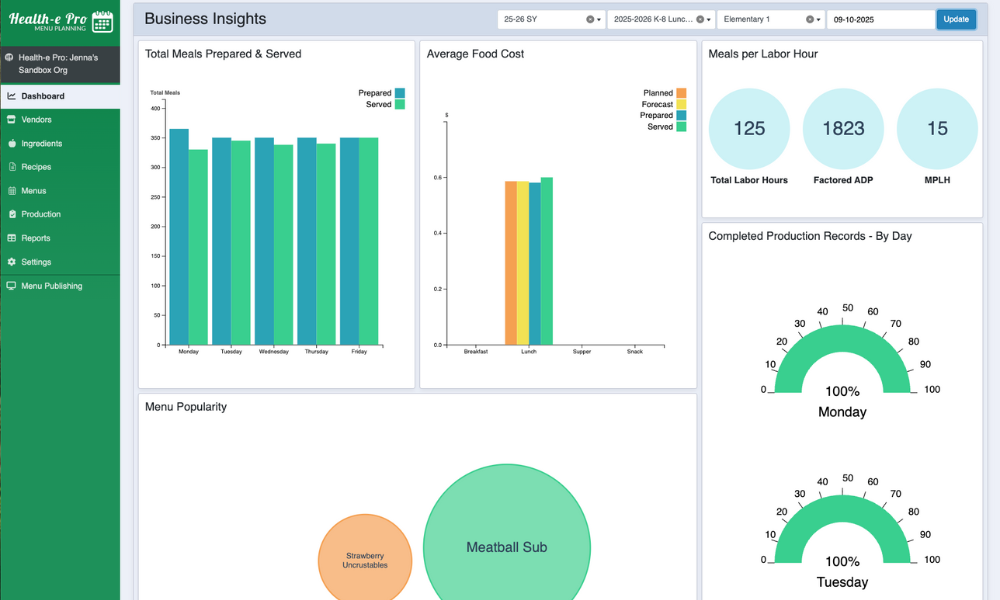
Data and feedback give you additional direction. Start by reviewing old menus and production records to see what has previously worked for your program and what didn’t. Which meals were student favorites? Which meals weren’t as popular? The truth is in the numbers! If you use Health-e Pro Menu Planning, you can easily find these insights right on your Business Insights Dashboard!
Then talk to students. A short survey or quick conversation during mealtime will help you figure out what they actually like and want to see on the menu. You can even link a survey directly to your published menu in Health-e Pro. Use one of our survey sidebars or create your own to collect feedback right from your community. Pairing numbers with real student feedback will give you a clear path forward with your menu.
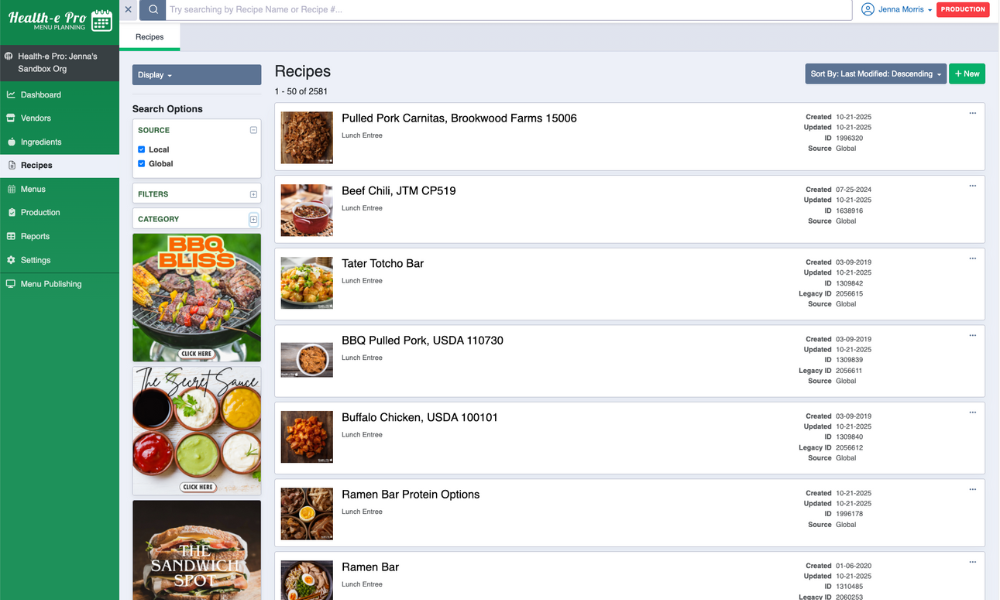
Don’t forget your standardized recipes. They’re the backbone of your menu and help you make sure every meal is consistent and compliant. Create and test recipes before you start building the menu framework. This helps you plan for menu variety, budgeting, labor, prep time, equipment, and deliveries. Standardized recipes are the building blocks for a menu that works. Health-e Pro users have access to more than 5,000 ready-to-use recipes, making menu planning faster and easier than ever.
Step 3: Building Cycle Menu Framework
Once you have collected the data, it’s time to building your cycle menu! Plan with the end in mind and make sure USDA regulations guide your planning.
Start with student favorites. Make sure popular entrees are spread throughout the cycle so students have something to look forward to. You can’t go wrong with chicken tenders, tacos, and pizza because they are familiar and always a hit!
Now add variety. Space out similar flavors and rotate proteins and grains so the students aren’t seeing the same thing over and over. Avoid repeating similar meals too close together. For example, you don’t want to put chicken on the menu three days in a row or offer pork nachos and beef tacos in the same week. Try adding a few meatless options, like a yogurt parfait or hummus platter, to incorporate more variety. Ingredient and Recipe Collections inside Health-e Pro give you quick access to creative meal ideas you can add to your menus!
Think about the sides. You want to pair fruits and vegetables with entrees that complement each other. For example, Doritos Walking Taco pairs well with steamed corn and fresh salsa, and General Tso’s Chicken pairs well with steamed broccoli and diced pineapple. Consider adding a fruit and vegetable bar with a few options each day. Offer different styles of fruits and vegetables, such as fresh, local, frozen, and canned. It’s a simple way to add choice for students while meeting your weekly minimums and vegetable subgroup requirements.
Consider the colors. No one wants a lunch tray that is full of foods that are the same bland color! Incorporating a rainbow of colors keeps trays exciting while providing a variety of nutrients.
Balance your budget. Incorporate USDA Foods to offset higher-cost items from your prime vendor. Seasonal fruits and vegetables can lower costs and add variety at the same time. Look at your cost per meal and make sure your menu stays within your reimbursement rates. Health-e Pro’s Business Insights Dashboard makes it easy to see this data in real time while you plan.
Make the menu fun. Incorporate theme days like Meatless Monday, Taco Tuesday, World Flavors Wednesday, or Fresh Fruit Friday to get kids excited. You can also highlight local produce, feature a “Sandwich of the Week”, and choose a few foodie holidays to celebrate!
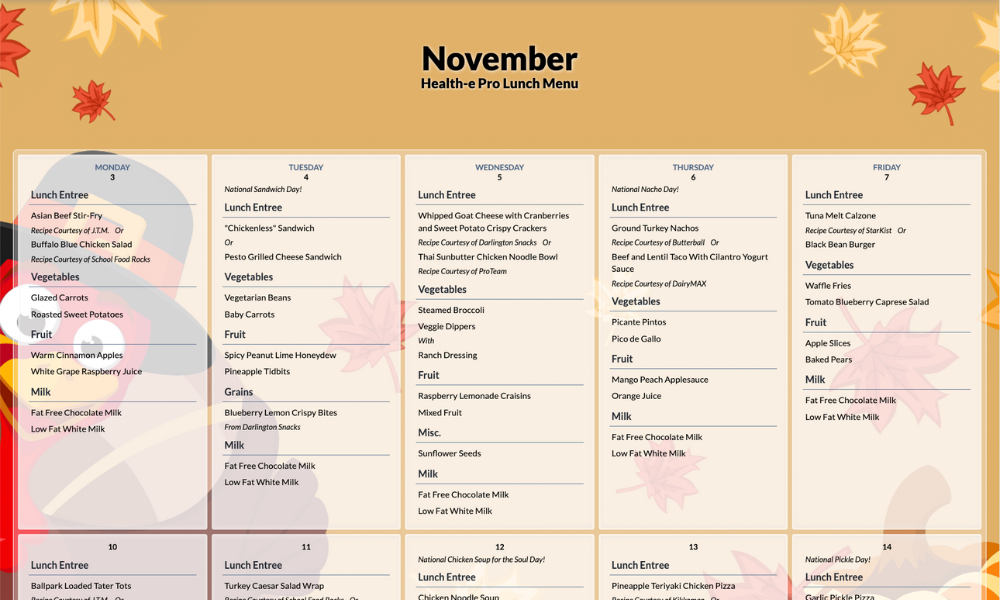
Need some inspiration? Take a look at Health-e Pro’s November Menu to see how these ideas come together!
Step 4: Consider Staffing and Logistics
A menu only works if your team can bring it to life. Think about your staff’s skills, prep and service time, equipment, and delivery schedules. Meals like frozen pizza, hot dogs and chicken nuggets are perfect for Mondays, Fridays, or delivery days because they require less prep. Scratch-cooked meals would fit better in the middle of the week when your team has more time.
Plan with the equipment you have. If chicken nuggets and french fries are on the menu on the same day, and need the oven at the same time, will your ovens be able to handle it? If not, you will need to adjust your menu and serve steamed or fresh vegetables instead.
Delivery schedules matter too. Plan menu items that need minimal prep on delivery days, because putting away orders takes time away from cooking. Also, check when your fresh produce is scheduled to arrive so you don’t have to store the product for too long and risk the quality.
Think about storage space. Do you have enough storage to hold items that are on the menu?
Step 5: Check Your Cycle Menu For USDA Compliance
Once your menu is built, check for compliance. Refer to the School Breakfast Program and National School Lunch Program Meal Pattern Requirements for specifics.
Ask yourself some questions:
- Does each meal meet calorie ranges for the specific grade level?
- Are all components included each day?
- Are vegetable subgroups covered?
- Are 80% of grains offered weekly, whole grain-rich?
- Are your sodium levels within the weekly limit?
- Are saturated fat and added sugar targets being met?
Since you are using standardized recipes this makes compliance easier. With recipes and nutrition information that is consistent every time, you know your menu meets the standards. And USDA-approved software, like Health-e Pro, helps too!
Why Building an Effective Cycle Menu Matters
A well-built cycle menu brings it all together: student favorites, labor, equipment, delivery schedules, budget, and USDA requirements. When it all works together, your menu becomes more than a plan. It becomes a tool that drives your business and keeps students coming back for meals they love.
Key Takeaways
- Set clear goals to shape your menu from the start, whether that’s boosting participation, managing costs, or streamlining operations.
- Use data and student feedback to guide your decisions and build a menu that reflects what students actually enjoy.
- Design a balanced framework that mixes student favorites with variety, smart budgeting, and colorful, appealing trays.
- Plan with your team and kitchen in mind, making sure the menu fits your staff capacity, equipment, storage, and delivery schedules.
- Check for USDA compliance early so your menu meets all meal pattern requirements and is easy to maintain throughout the year.
- Treat your cycle menu like a strategic tool, not just a schedule. It supports your staff, drives participation, and strengthens your entire program.
Click here for a colorful PDF guide: 5 Steps to Building an Effective Cycle Menu
This blog post has been updated on 1/5/2025 to reflect an updated recipe count. Health-e Pro’s Global Recipe Database now includes 5,000+ recipes (up from 4,800).